Strength of materials
Node balancing method
- What is the method of joint equilibrium? - principles and applications
- Example - method of joint equilibrium
- Step 1 - numbering of bars and markings
- Step 2 - calculation of support reactions
- Step 3 - determination of zero-force members
- Step 4 - equilibrium of joints
- Video - solution using the method of joint equilibrium
From this text, you will learn more about the Method of Joint Equilibrium and you will find examples of solutions for trusses using this method.
What is the method of joint equilibrium?
The method of joint equilibrium involves mentally cutting successive joints of the truss and writing the equations of static equilibrium in them - the sum of projections on the "x" axis and on the "y" axis. This way, we are able to calculate two unknown forces in the members.
Therefore, when calculating the truss using this method, we must start from a joint where we have at most two unknowns (i.e., a joint to which only two members converge). Usually, there is one or two such joints in the truss.
At the location of intersecting members, we insert axial forces, which can be denoted, for example, as "N" or "S" with the appropriate subscript to describe in which member this force is located.
Note!
Before we proceed to learn the method of joint equilibrium, it is worth already knowing the Theorems on Zero Force Members. If you are interested in Ritter's method <- koniecznie zajrzyj tutaj.
And now let's see this in practice - solving a truss using the method of joint equilibrium.
Computational example with extensive commentary.
Example - method of joint equilibrium
Content
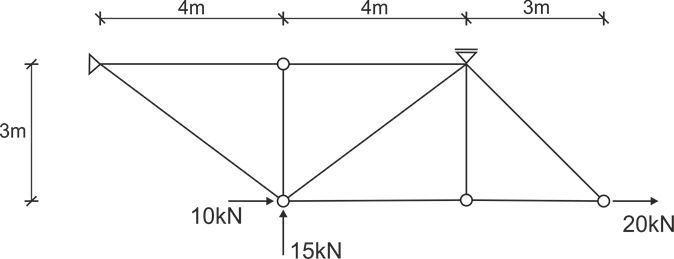
For the given truss, identify the zero force members and determine the forces in all members using the method of joint equilibrium.
Solution
Step 1
Number the members, optionally label the joints, and indicate the support reactions.

Step 2
Write the equations of static equilibrium and calculate the support reactions.

Step 3
Identify the zero force members.
These will be members 4 and 6 from the third theorem on zero force members and member number 7, from the second theorem
Step 4
We perform joint equilibria.
We can essentially start either from joint A or from joint (7-9).
Let's start from joint A (1-3).

We write the equations of static equilibrium for this joint
We can write the sum of projections on the "x" and "y" axes

Similarly, we cut joint (3-4-5-8)

At this point, we have identified three members initially as zero, and the next four were calculated from the equilibrium of two joints, so we have 7 out of 9 members. The remaining member number 9 and member number 2.
From the second theorem on zero force members it follows essentially an additional principle - if a force loads a joint in such a way that its direction is collinear with one of the members and no other force can be projected onto this line, then the force in the member is transmitted collinearly.
Let's look at the figure below, which presents the diagram of normal forces.
We have such a situation in the joints marked in the figure.

Diagram of normal forces, labeling:
DODATNIE

UJEMNE

Video - solution using the method of joint equilibrium
The same in video format with a more detailed description of the entire equations and individual steps.